|
MATERIALS:
INSTRUCTIONS:
4. Fold the denim fabric in half and pin the pattern pieces along the fold.

6. Using the same pattern pieces, cut out your lining fabric.

8. With right sides of denim together, stitch brim pieces together with 1.3 cm wide seam allowances. Press (iron) seams open flat.

10. With right sides together, pin and stitch denim brim pieces to lower side pieces.
TOP TIP: Avoid lining up the seams so you are not stitching through more than three layers of denim at once. 
12. With right sides together, slip lining hat inside denim hat. Pin and stitch denim to lining 1.3 cm from edge of brim. Leave a 10 cm long opening.

14. Top-stitch through all layers around the edge of the brim.
|
INSTRUCTIONS:
1. Measure the circumference of your head using a flexible tape measure. Choose your size:
small: 55 cm medium: 57 cm large: 59 cm 
2. Cut down the seams of your jeans and open them out flat.

3. Download the pattern pieces here: denim bucket hat pdf. Print the pattern out onto paper. Make sure your page size is set to 100%
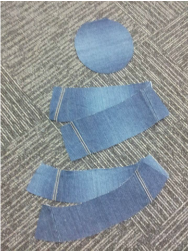
5. Cut out the fabric.

7. With right sides of denim together, stitch side pieces together with 1.3 cm wide seam allowances. Press (iron) seams open flat.

9. With right sides together, pin and stitch denim top piece to the upper side pieces. TOP TIP: Either 'shear' the edge with pinking shears or use an over-locker to stitch the edges.

11. Sew lining pieces together in the same way as the denim. TOP TIP: Remember to cut the edges with pinking shears or sew the edge through the over-locker.

13. Turn hat right-side-out through the opening. Press (iron) this brim seam flat. Slip-stitch opening closed by hand. You may also choose to invisible stitch the opening. Below is a great link for INVISIBLE STITCHING. http://quilttaffy.blogspot.com.au/2008/07/invisible-closing-seam-tutorial.html
|
Denim Reversible Hat
Perfect way to revamp some old jeans into a perfect bucket hat!
